Category Archives: Cleaning

DIY: All-Natural Toothpaste

For about a year now I have been making and using my homemade toothpaste. Most people cringe and wonder if it works. I am here to tell you that it does. I have never had a cavity, and my dental hygienist says my teeth and gums looks great.

Why did I stop using store-bought toothpaste? The answer is simple. I figured if the label says “do not swallow” and “if swallowed contact poison control” that it probably wasn’t a good thing to be putting in my mouth. It seems like a pretty easy task to keep our teeth clean, brushing and flossing and mouthwash isn’t too complicated of a routine, so why did toothpaste have to be complicated? Why does it have to contain sugar … something that causes tooth decay??? seems counter productive. Why does it have to contain nasty chemicals that can poison me? Why would I put that in my mouth? Okay, you get my point.

diy toothpaste

(this picture is from the first sample I made myself)

I’ve researched different toothpastes and tooth powders, tried some differing variations, and I have no concrete “recipe” to share with you. But here is my go to toothpaste ingredient list:

I usually make a large batch (a couple jars at a time), sometimes I make some to give to my friends to try. But here is my general method:

  1. Melt some coconut oil in a small bowl or right in your glass jar. If this is your first batch, just make a little bit to try it out, a few tablespoons will do.
  2. Now add enough baking soda to the toothpaste to make a paste. (the paste consistency will be determined by the temperature of your house. In the summer the toothpaste can be more liquidy due to the heat, and in the winter very hard due to the cold)
  3. Now add 10-20 drops of peppermint essential oil. (Obviously, more or less depending on how much you are making)
  4. Now add 5-10 drops of tea tree oil.
  5. If you need to make it sweet like the store bought kind, this is where you add the xylitol or stevia to your taste. I made mine sweet at first when I was transitioning to natural toothpaste, now I leave it out completely.

You can also add other cleaning agents. I have heard of ground sage and bentonite clay being added. Also, you can leave out the coconut oil completely and make a toothpowder. People add sea salt to some tooth powders. It’s all about experimenting to see what you like and can tolerate.

To use, I just dip my brush head into the jar and get some on the bristles. I also use an electric toothbrush. I feel like it does a better job of using the grit from the baking soda to get my teeth nice and clean.

I will also be putting up my recipes for mouthwash and retainer/denture cleaner!

Until next time, I send you peace, love and good energy.

~Sharon


Wash your yoga mat!!!

The inspiration for this post is from my new friends I met at yoga the other night. I had just laid my mat down in the room and was spraying it with my Balance Yoga Mat Cleaner when one of my fellow yogis asked what I was spraying. I showed the bottle to her and explained that I normally wash my mat, but that I use this natural spray to freshen it up. She told me she had never washed her mat and that it smelled “plastic-y.”

As I walked back to my mat it occurred to me that many people may not wash their yoga mats, may not know how, or where to begin. So, I thought I would share with you how I keep my mat clean.

Why wash your mat? Well, if you think about it, you put it on the ground, where everyone’s feet have been walking around all day. Then, you lay on it, put your face all over it, put your feet on it, and generally roll all around on this thing during class. I have no scientific research to prove that there are probably germs all over it, but common sense tells me it is something that is probably dirty, and I should probably wash it.

I generally wash my yoga mat after each practice. Especially if I did Bikram yoga…

Note: Please check if your mat is biodegradable. If it is, this method is not for you. If you submerge a biodegradable mat in water … it will most likely disintegrate.

What you will need:

How to:

  1. I start filling my washer with hot or warm water.
  2. I then add about 1/3 cup of my natural laundry soap.
  3. Next, I add my natural fabric softener to the rinse cup. My fabric softener also doubles as a disinfectant.
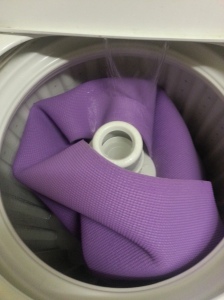
  4. Then I put my yoga mat in like so:
    For the visual learners :)

    For the visual learners 🙂

    (I can fit 2  yoga mats in at the same time.)

  5. I set my washer to a normal wash.
  6. Once the wash cycle is over, I hang my yoga mat to dry. I am fortunate enough to have a drying rack, I just lay it over the top and let it air dry. If you don’t have a drying rack, you can put it over the shower rod, or even over the top of a door to dry.

Do you wash your yoga mat??? If so, please comment below and tell us how you do it!

Until next time, I send you peace, love and good energy!

~Sharon


Natural Fabric Softener

Okay, I admit, dryer sheets smell awesome but, they are bad for us:

US National Library of Medicine: Respiratory toxicity of fabric softener emissionshttp://www.ncbi.nlm.nih.gov/pubmed/10872633

Since I’m not a scientist or doctor – you can read that abstract or google your little heart out to find out why they are so bad.

So what’s our option to those toxic sheets of anti-static magic? One word: vinegar. Vinegar is a natural deodorizer and cleaner, and amazingly, it prevents static. Did I mention cheap? Okay – it’s cheap, too.

How do I use it? Add about a half of a cup to the rinse cycle, an old downy ball, or the fabric softener cup inside your machine.

I found a lot of great information about natural fabric softeners on DIY Natural’s website. They have great tips on how to use essential oils to help boost your laundry, too.

New twist! Whitening fabric softener!!!

As many of you may know – lemons have natural lightening properties. Lemon essentials oils are used as a natural bleach. Since I already had some lemon rinds steeping in some vinegar, I decided to see how well it worked on a dirty cream-colored jacket that needed a good washing.

I simply strained the lemon rinds which had been soaking for about 2 weeks in the jar of vinegar, and put the resulting liquid into an old bottle, and then filled it the rest of the way with fresh white vinegar. I labeled it so no one uses this on colored clothes, since it has the potential to ruin/bleach them.  I used a 1/4 c. of my natural laundry soap and about 1/4 c. of the lemon fabric softener for a small load.

The results? Awesome! The jacket that had black and brown smudges on it was clean and cream once again. The smell? Naturally clean. I promise you, your clothes will not smell like vinegar.

Give it a try! You might be amazed with the results, and all the money you have saved.

Let me know what you think in the comments section. How else do you use vinegar? I know I use it for just about everything!

Until next time, I send you peace, love, and good energy.

~Sharon

Natural Laundry Detergent

I read a great line on DIY Natural’s blog the other day:”If they sell it in the store, you can make it at home.” This is SO true. In my quest to go all-natural, one of the easiest things to get rid of is that toxic crap they call laundry soap. It’s bad for you, it ruins your clothes, and destroys the environment. To add insult to injury, they charge ridiculous prices for it!

I am going to show you the two recipes I’ve been using that are all-natural. The best part is they are EASY to make and SUPER CHEAP! I’ve read a ton of blogs and articles about making your own natural laundry soap; some are more complex than others. The point of this blog is practical ways to live healthy and green on a busy schedule, so without further adieu, here’s some stuff that will clean your clothes:

The Original Recipe:

I have a huge glass canister that holds this recipe, tripled. I use an old 1/4 c. measuring cup in there to measure out my scoops. This recipe does a great job cleaning our clothes, however, there is a downside:

The grated bits of soap don’t always dissolve, so sometimes, I will find little chunks of soap on clothes. I try to remedy this by putting the washer on a 15-30 minute soak cycle. I allow the basin to fill with water, add the soap (while it is filling), and once it is filled, I add my clothes. This extra time allows the soap an oppotunity to dissolve. 

The New and Improved Recipe

Use a funnel to put the borax, washing soda, and baking soda in the jug. Fill the jug 1/3 of the way with hot (not boiling) water. Put the cap on and shake to dissolve the borax and sodas. Now add the peppermint soap, and fill the rest of the way with cool water. Give it a shake, and it’s ready to go!

I like my new recipe much better. It is less work than the first one (grating soap can be tiring), no soap chunks, and it seems to clean better! I do use more of this, about 1/2 c. since it is a diluted mixture. Our clothes are always clean and fresh. Since there are no harsh chemicals, our clothes last longer and don’t fade. Win Win!

If you have any questions, please do not hesitate to ask.

Until next time, I send you peace, love, and good energy.

~Sharon