How to Make Your Own Organic Kale Chips!

The Crunchy Journal

Kale ChipsI have fallen into the kale chip craze, and I may need a rehabilitation program to get over how amazing this snack is. I wasn’t sure if I would be a fan of the crispy version of the bitter “super food,” so I journeyed to my local grocery store to purvey their selection of kale chips.

One brand was a curry flavor and did not look appetizing. Next, I found a vegan cheese version called Brad’s Raw Leafy Kale Chips. This one looked yummy, plus they were on sale, so those came home with me. As I was cooking dinner that night, I popped open the box and started munching on these leafy chips … and to my surprise, they were delicious! I was surprised by the flavor and how addicting they were. I nearly ate the entire box while making dinner!

While I was impressed with this crispy delights, I was not impressed…

View original post 341 more words

Natural Laundry Detergent

The Crunchy Journal

I read a great line on DIY Natural’s blog the other day:”If they sell it in the store, you can make it at home.” This is SO true. In my quest to go all-natural, one of the easiest things to get rid of is that toxic crap they call laundry soap. It’s bad for you, it ruins your clothes, and destroys the environment. To add insult to injury, they charge ridiculous prices for it!

I am going to show you the two recipes I’ve been using that are all-natural. The best part is they are EASY to make and SUPER CHEAP! I’ve read a ton of blogs and articles about making your own natural laundry soap; some are more complex than others. The point of this blog is practical ways to live healthy and green on a busy schedule, so without further adieu, here’s some stuff that will clean your…

View original post 313 more words

DIY All-Natural 5 Minute Body Wash!!!

The Crunchy Journal

When I began my mission to eliminate chemicals and toxins from my household that also included the products I used on my body. It’s scary to think about all the things we put on our skin (our largest organ) which we have been lulled into complacency to believe are safe. Instead of putting {insert long list of unnatural synthetic carcinogenic ingredients here}, I decided to do a lil digging to see what other’s are doing. My friend Sarah B. had recently posted on facebook a picture of homemade body products. I asked her if she would share her recipes with me, and she was kind enough to do so.

At first, it was hard to get used to the natural body wash – it was not gel-like like the products you would buy at the store. BUT!!! I instantly felt better about what I was using. It left me feeling…

View original post 330 more words

The Shampoo v. “No-poo” Compromise

I’ve been on the crunchy lifestyle bandwagon for a while now. My mission to live a sustainable lifestyle has taken some unexpected turns. One of my favorite things to do has been replacing my beauty items with sustainable, homemade versions. In fact, I have a batch of homemade body butter cooling in the kitchen right now.

I’ve tried the so-called “no-poo” method (i.e. baking soda and water as a replacement for shampoo). Can I just take a moment to say what a horrible name that is!?! Okay, end rant. I tried the standard baking soda and water shampoo replacement method. Long story short, for whatever reason, this method did not work for me. I can’t pin the failure on the water, my hair type or the environment, or just the plain fact that it doesn’t work. My hair just felt thick and dirty, never that fresh and clean feeling. However, my fellow sustainable bloggers swear by it. It just did not work for me.

This failure spurred a desire to fix it. I could not simply go back to shampoo. I had to find some answer to a healthier method to cleanse my hair than the chemical-laden cocktail that was sold at the store. Organic versions are better, yet expensive and still don’t fix the problem of using detergent on my hair.

I am advocating against washing your hair with conventional shampoo. Why? Here are my reasons:

  • Shampoo strips your hair of its natural oils and moisture. Our hair actually produces its own natural oil which acts as a conditioner and moisturizer;
  • Conventional shampoo is toxic, see an article here; I don’t want to spread toxic chemicals that are known carcinogens onto my scalp each and every day;
  • It’s unnecessary. Before 1930, we didn’t even have what we now know as shampoo.

I have now been washing my hair with my “compromise” method for a few months. To be perfectly honest, I was skeptical and not sure if I would stick this one out. I think the method I have designed is a nice compromise between using organic shampoo and the baking soda method.

This method does take some getting used to. You will more than likely go through a bit of a greasy phase. If you experience this, have no fear, there is a natural dry shampoo method found here. Use this dry shampoo during the transition phase.

This is my compromise recipe:

Shampoo

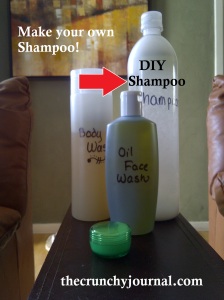
  1. Fill and 8 ounce squeezable bottle with water, leaving some room at the top. You can also re-use an old shampoo bottle or any other suitable container.
  2. Add 1 teaspoon of baking soda.
  3. Add 1 teaspoon of organic shampoo. I use this kind.
  4. Add 1/2 teaspoon of sea salt.
  5. Now shake to combine.

To use:

  • In the shower, I wet my hair thoroughly and massage my scalp to loosen any oil or dirt
  • Next, I squeeze my alternative solution onto my roots and scrub, scrub, scrub
  • I wash my face, allowing the mixture to remain on my hair for a few minutes
  • Then, rinse while massaging my scalp.
  • I’m still working on an alternative to conditioner … so stay tuned.
  • I then use my homemade body wash.

Let me know how this works for you! Everyone’s hair is different, so tweak the recipe as needed.

Until next time, I send you peace, love, and good energy.

~Sharon

DIY: All-Natural Toothpaste

For about a year now I have been making and using my homemade toothpaste. Most people cringe and wonder if it works. I am here to tell you that it does. I have never had a cavity, and my dental hygienist says my teeth and gums looks great.

Why did I stop using store-bought toothpaste? The answer is simple. I figured if the label says “do not swallow” and “if swallowed contact poison control” that it probably wasn’t a good thing to be putting in my mouth. It seems like a pretty easy task to keep our teeth clean, brushing and flossing and mouthwash isn’t too complicated of a routine, so why did toothpaste have to be complicated? Why does it have to contain sugar … something that causes tooth decay??? seems counter productive. Why does it have to contain nasty chemicals that can poison me? Why would I put that in my mouth? Okay, you get my point.

diy toothpaste

(this picture is from the first sample I made myself)

I’ve researched different toothpastes and tooth powders, tried some differing variations, and I have no concrete “recipe” to share with you. But here is my go to toothpaste ingredient list:

I usually make a large batch (a couple jars at a time), sometimes I make some to give to my friends to try. But here is my general method:

  1. Melt some coconut oil in a small bowl or right in your glass jar. If this is your first batch, just make a little bit to try it out, a few tablespoons will do.
  2. Now add enough baking soda to the toothpaste to make a paste. (the paste consistency will be determined by the temperature of your house. In the summer the toothpaste can be more liquidy due to the heat, and in the winter very hard due to the cold)
  3. Now add 10-20 drops of peppermint essential oil. (Obviously, more or less depending on how much you are making)
  4. Now add 5-10 drops of tea tree oil.
  5. If you need to make it sweet like the store bought kind, this is where you add the xylitol or stevia to your taste. I made mine sweet at first when I was transitioning to natural toothpaste, now I leave it out completely.

You can also add other cleaning agents. I have heard of ground sage and bentonite clay being added. Also, you can leave out the coconut oil completely and make a toothpowder. People add sea salt to some tooth powders. It’s all about experimenting to see what you like and can tolerate.

To use, I just dip my brush head into the jar and get some on the bristles. I also use an electric toothbrush. I feel like it does a better job of using the grit from the baking soda to get my teeth nice and clean.

I will also be putting up my recipes for mouthwash and retainer/denture cleaner!

Until next time, I send you peace, love and good energy.

~Sharon


Vegetarian Grilling: Vegetable Tofu Skewers

One of my go-to dinners for summertime is grilled veggies. There are so many great vegetables to choose from and they taste amazing over an open flame. As summer winds to a close and fall puts that nip in the air … I can’t help but want to wander out to my grill and give it some more love before it’s too cold to use it. (Though, I’m not afraid to grill year-round.)

Being constantly busy with work and school, I need quick healthy meals to keep my body in working order. Here’s a little diddy I came up last night. I hope you enjoy it as much as we did. (No leftovers! Ha!)

What you will need:

  • 1 pkg. of baked tofu
  • 2 zucchinis
  • 1 container of mushrooms (I chose crimini)
  • 3 skewers
  • spices
  • salt & pepper
  • oil/butter/non-stick spray

Serves two. All ingredients are organic.

Note: Tofu tends to stick, so make sure it’s properly oiled before putting it on the grill.

Let’s get started!!!

  • Pre-heat the grill.
  • Wash the zucchini, and slice into 3/4 inch thick rounds.
  • Wipe the mushroom caps with a damp cloth to get the dirt off, cut the stems off.

  • Open up the tofu and cut into about 1 inch chunks (I got 8 chucnks out of mine).
  • Sprinkle mushrooms and zucchini with salt, pepper, and your favorite grilling spices. I used pepper, garlic salt, and McCormick’s “Savory” blend.
  • Skewer your items in whatever order you choose.

  • I melted a couple tablespoons of butter mixed with a couple tablespoons of olive oil to brush on my veggies so they don’t stick to the grill grates. You can use whatever you want to keep it from sticking.
  • I turned my grill all the way to low beause it runs hot, but probably somewhere between low to medium will be perfect for cooking these.

  • Turn every 3-5 minutes, so they get a little char on them, but don’t burn. Brush them again with the buttler/oil mixture,
  • Remove after about 15 minutes and serve!

They are tasty on their own, or you can dip them in teriyaki sauce. Enjoy!

What’s your favorite food to grill?

Until next time, I send you peace, love, and good energy.

~Sharon

DIY Surface Cleaner: All-Natural & Non-Toxic

The Crunchy Journal

When I was researching ways to get toxic chemicals out of my house, I stumbled upon some amazing information. One piece of information was how to make your own surface cleaner that would not only clean, but disinfect. It can be used in the kitchen, in the bathroom, and even on glass. It’s simple, cheap, and safe.

What you will need:

  • an empty spray bottle (if you reuse one from a previous product, be sure to wash it thoroughly)
  • white vinegar
  • water
  • dish soap (optional)
  • a funnel (to assist in pouring, also optional)

Here we go … Remove the nozzle and fill your bottle halfway with water (does not need to be exact).   Next, fill the other half with white vinegar.

The next part is optional: I add one drop of dish soap to this mixture. It helps with getting grease off surfaces. You can leave it out.

Then, put the lid on top, give it…

View original post 71 more words

The Great Tofu Scramble Adventure

The Crunchy Journal

Okay, I know what you might be thinking … “tofu scramble sounds so gross!” Others may be thinking that this sounds incredibly yummy. Still, others might just be curious to see what the heck I’m talking about. I encourage everyone to keep reading. There is delicious food to be had!

For long-time tofu connoisseurs, this is nothing new. For me, this is an alternative to morning scrambled eggs. I don’t know why, but lately eggs have been … how do I put this nicely? … eggs are making me queasy and I just can’t eat them!!! So, I embarked on a googling adventure to find an alternative to the morning staple and here’s what I came up with:

Now, please forgive me in advance, I am of Italian descent so I do not measure anything when I’m cooking. I will give you my best approximation of how much I used…

View original post 507 more words

Lilly the Deer: Save her from being removed from her family

Please read this story … and if you are compelled, as I was, please sign the petition.

http://www.change.org/en-GB/petitions/lilly-the-deer-save-her-from-being-removed-from-her-family

Until next time, I send you peace, love, and good energy.

~Sharon

Apple Ring Pancakes

On the hunt for a healthier breakfast and craving pancakes simultaneously lends itself to a predicament that most of us face. What to eat for breakfast that’s healthy and tasty?

As I perused my kitchen for my available selection of ingredients, I noticed I had some apples, and thought to myself “What if I dip the apple in the pancake mix and then cook it?” And this is what happened:

What you will need:

  • Enough pancake mix for your family or you can use this recipe to make pancakes from scratch. I used 1 cup of pancake mix and prepared it according to the directions.
  • Enough apples for your family, peeled, cored, and sliced into rings. I used one large apple for me and Sugar.
  • Hot buttered skillet.Buttered skillet
  • Real maple syrup.

Method:

  1. Prep pancake mix. Batter
  2. Peel, core, and slice apples into 1/4 inch thick rings. Apple
  3. Dip the apple ring in the batter. Let the excess drip off. Apple dip
  4. Cook in a buttered skillet until golden brown. Apple fryApply cooking
  5. Serve with maple syrup and your favorite sides. Breakfast 2
  6. Mmmmmmm!

Until next time, I send you peace, love and good energy!

~Sharon